Rebecca Sedwick Collab


 >


Rock Chick FTU

Template: Template 129, by Rosey can be found here.
Tube: by Jamie Kidd, Candice 62-1, available for purchase at CDO.
Filters used: Mura's Cloud & Copies, PentaCom ColorDot, Xero Fratillary.
Foreground Colour=6F2F65
Background Colour=090909
SA=Select
F=Float
DF=Defloat
NL=New Layer
SN=Select None
Drop shadow used: 2,2,35,5, can be added after finishing eash step.
Deleted template layers after each step.
We'll begin by making our own mask for this tag.
Open a new image, 834x456, flood fill with black, add a new layer, use your rectangle selection tool with these settings: Rectangle, Add (Shift), Feather 45, Anti-alias checked. Draw out a medium sized rectangle on your new layer, be careful not to get to close to the edges of your image, flood fill with white, center this layer in your image and merge layers down.
Open the template, duplicate the image and close the original.
Delete the credits layer, layer 10 and copy of layer 10.
Select the bottom layer and add a new layer, flood fill with black and apply your new mask, merge group.
Create a Linear gradient using the foreground and background colours, Angle 0, repeats 0.
Select Raster 12 layer in your template, SA, F, DF,NL, flood fill the selection with your gradient, SN.
Select Copy of Raster 12 layer, SA,F,DF,NL, Invert the gradient and flood fill with the gradient, SN.
Select Raster 13 layer, SA,F,DF,NL, flood fill with forground colour, keep selected and apply Mura's Cloud filter use default settings, repeat for copy of raster 13 layer.
Select Raster 11 layer, SA,F,DF,NL, flood fill with your gradient set on Sunburst, invert UNchecked, SN, DO NOT DELETE this layer hide template layer.
Select Raster 8 layer, SA,F,DF,NL, flood fill with your gradient set on Sunburst, invert UNchecked, apply Penta Com Color Dot, change the Value to 120 and the Distance to 10, SN, hide template layer.
Repeat for Copy of Raster 8 Layer.
Select Raster 2 layer, SA,F,DF,NL, flood fill with LINEAR gradient, invert checked, repeats 1, Adjust, Add Noise, Noise=75, Gaussian and Monochrome selected, repeat noise, keep selected.
Selections, modify, contract by 5, add a new layer and flood fill with the same linear gradient, SN.
Select Raster layer 1, SA,F,DF,NL, flood fill with your back ground layer, repeat for copy of raster 1 layer.
Select raster 3 layer, SA,F,DF,NL, flood fill with your foreground colour, apply Xero Fratillary using these settings: Granularity=3, Aggression=170, Tessalation=17, Variation=67. Repeat this step for the Copy of Raster 3 layer.
Select raster layer 5, SA,F,DF,NL, flood fill with your background colour, do NOT delete the template instead and some noise to it using the same settings as before, repeat this for copy of raster 5 layer.
Ok lets add the tubes now.
Go back to Raster 11 layer SA,F,DF, copy and paste the medium sized tube as a new layer, selections invert and hit delete. Layers arrange, move up, change the blend mode to Overlay. You can now delete the template layer.
Select your tube layer again, and hide all the layers in your layers pallet that are below the tube layer including the tube, select the very top layer in your pallet and merge layers visible. You can now unhide everything.
Using your move tool, move your merged layer down a bit in your image.
Select your text tool, create as Vector, using a pixel font set at 10 and background colour set at 6F2F65 type your name, Align, Center In Canvas.
Apply Mura's copies use these settings: Pre-set Menu=Tiling, Shift Mode=Line, Tile Mode=Normal, change Number to 1 and gap size to 2 hit OK. Position so that it fills nicely inside the black rectangle on your merged layer.
Back to your merged layer use your magic wand, feather set at 0 and click inside the Black rectangle, selections Invert, go to your text layer that you just did and hit delete.
Copy and paste the Small size tube (layer 1) as a new layer position to the right, see finished tag. Add a drop shadow of 3,3,100,10 with shadow on new layer checked.
Use your erasor to erase the bottom of the shadow, this will make the tube look better. Select your tube layer and Merge Down.
You can add your name again if you choose, resize all layers 70%, add © and YOUR DONE!!
Darkest Night

Booga Booga

Spiral Out of Control

Spiral Out Of Control
Filters used:
Tramages-Spiral3, and Pool Shadow
Jeux De Lignes, Entrelacment
AAA Filters-Good Vibrations,
AAA Filters-Foto Frame,
DSB Flux-Noise,
Lokas 3D Shadow,
Mura's-Copies
Font: Mea Culpa
New image 600x250, using foreground (FG) colour 675D39 and background colour (BG) 412426 create a gradient choose the Starburst Style with repeats at 9. Flood fill your image.
Apply Tramages Spiral 3 filter set Rotations at 3 and Darken/Lighten to 236.
Custom Selections, Left-0, Top-75, Right-600, Bottom-175, promote secton to layer.
Selections, Modify, contract by 3, select the Raster 1 layer hit delete, select none. Apply AAA Filter, Good Vibration using these setting: Frequency 5, Amplitude 4, Frame Size 0, select Waves and Lighten. Repeat the filter.
Select the Promoted layer and lower opacity to 58, select none. Apply Jeux De Lignes use default settings.
Add a drop shadow, -9,9,100,15, and then again at 9,9,100,15.
New layer, flood fill with BG colour, layers arrange send to bottom.
Layers Merge Visible, apply AAA Filter Foto Frame enter these numbers starting at the top, 4, 55, 15, 1, 0, 10, 0, 100.
New layer. Custom selection, use the same settings as before, selections modify, contract by 15, flood fill with your FG colour, select none, move the rectangle to the right edge of the white frame.
Apply Tramages Pool Shadow use default settings.
Type your name size 36 in Vector, go to Objects, Align, Center In Canvas, convert to raster layer. Apply Mura's Copies, Line setting, you'll have to adjust the "number" according to the length of your name, mine is only 4 letters long so I chose 5.
C/P your tube and position to the left, apply Lokas 3D Shadow I used these setting, Blur 90, Transparency 23, Angles X,Y,Z 0, Offsets X, Y 10, Perspective 78.
Add your name again, and add a drop shadow 1,1,100,2.
Add your © and your done. Here's one I did for a friend.

Seductive

Kit Name:Brillamment created by Annliz available for download at Digiscrapbooking Boutique
Visit Annliz's blog here
Tube:Ismael Rac, Candycane, you can purchase this tube here. I've recoloured parts of the tube to suit my tag.
Mask: Vix Mask174 available here
Template: Template71 by AquaRebel315 dsnz here
Filters Used: DSB Bright Noise, Xero Radiance
Font:The Nautical Gal,size 100 forground 7747AE, background white.
This tut assumes that you have a good working knowledge of PSP, I use version 9 but I'm sure this tut can be done in any version.
This tut is of my own creation, similarities to other tuts is coincidental.
sa-f-df = Select All, Float, Defolat.
sa-f-df-nl = Select All, Float, Defloat, New Layer.
sn = Select None
c/p = Copy & Paste
ds = Drop Shadow
Open tube, template and mask in PSP, duplicate the template and close the original.
Delete the first 5 layers.
Let's begin
Starting on the bottom layer of the template unhide the background layer, add a new raster layer, sa.
Open pap1 and resize to 800x800 pixels, c/p pap1 into selections, sn, apply your mask and merge group.
Select the Raster 1 layer, sa-f-df-nl, open paper4, resize to 800x800 pixels c/p Into Selections, selections, modify, contract by 8 pixels, sn.
Apply an Inner Bevel use the settings below.

Apply a drop shdaow & hide the template layer.
Select Raster 2 layer, sa-f-df-nl, open paper1 resize to 800x800 pixels, c/p as new layer, move the paper up as far as it will go, selections invert delete, sn.
Apply DSB Bright Noise, settings Mix-57 apply again.
Repet this step for Raster 4 & Copy of Raster 4 Copy layers, delete the template layers as you go along, add a drop shadow.
Select Raster 3 layer, sa-f-df-nl, open paper3 resize 800x800 pixels c/p Into Selections, sn, delete template layer.
Repeat this step for layers 5 & Copy of Raster 5. Hide the template layers we'll use them again.
Select Raster 5 layer, sa-f-df, use close up of your tube, I've resized mine 60%, c/p as a new layer and position over the marching ants, invert and delete.
Layers, Arrange, Move to the top.
Apply Xero Radiance with these settings; Strangeness-191, Charm-50, Truth-33, Beauty-255. Go to Adjust, Hue & Saturation, both settings at 0, apply a ds.
Duplicate this layer and go to Image Mirror.
Open your full size tube and resize it 75% c/p this as a new layer.
Lets add some elements add drop shadows as you go along, I used the following but feel free to add any other that you like.
El18, resize 35% and then 40%, c/p above mask layer position to the left and down a bit, duplicate and mirror layers merge down, duplicate and Image flip.
El7, resize 35%, c/p as new layer move to the right, duplicate and mirror image.
El17, resize 35% and then 40%, c/p above mask layer position to the and down a bit, right duplicate and mirror layers merge down.
El15, resize 35% and then 60% c/p as new layer position at the bottom of the tag.
El19, resize 35% c/p as new layer place this layer above the and then resize again 50% c/p as new layer, position and duplicate Image Mirror.
Hide the white layer and merge visible, resize all layer 80%.
All done, add your text and ©.
In All Simplicity

Kit Name: In All Simplicity by MLDesign, you can download this kit at www.DigiScrapBooking.ch
You can visit her blog here
Tube:Polka by Anna Liwanag, I purchased this tube at PTE, not sure where she is selling now.
Mask: Vix Big Masks2, mask number 19 download here
Template: by Designs by Ali, it's a halloween mask you can find it here on her blog.
Filters Used: Xero Porcelain (optional)
Font: Sylfaen, just google I'm sure you'll find it. White forground black background.
This tut assumes that you have a good working knowledge of PSP, I use version 9 but I'm sure this tut can be done in any version.
This tut is of my own creation, similarities to other tuts is coincidental.
sa-f-df = Select All, Float, Defolat.
sa-f-df-nl = Select All, Float, Defloat, New Layer.
sn = Select None
c/p = Copy & Paste
ds = Drop Shadow
See finished tag for placement of tube and elements.
This is a full sized kit, so you'll have to resize papers and elements, I'll give the resize settings as we go along.
Open tube, template and mask in PSP, duplicate the template and close the original.
Delete the following layers;DBA, Raster 5, and mask layer.
Let's begin
Go to Image, canvas size increase the size to 750x650.
Start by selecting the bottom layer of the template, add a new layer and flood fill white, Layers Arrange, Send To Bottom.
Open P06 and resize to 800x800 pixels, C/P P06 as new layer, apply the mask and merge group. Use your Move Tool (M) to center the mask layer in your image.
Select the Back Rectangle layer, sa-f-df, open P08 and resize to 800x800 pixels, c/p P08 as newlayer, selelctions invert and hit delete.
Add a drop shadow 2,2,34,6 to the Rectangle Frame layer.
Select the Small Side Frame layer, sa-f-df, open P14 and resize to 800x800 pixels, c/p P14 as a new layer, selections invert and hit delete,rename this layer paper14.
Add a drop shadow using the same settings to the Frames layer.
Select the Rectangle Frame layer again, using your magic wand select the top black square, c/p your close up, position, invert selections and hit delete.
Dupilcate this layer so that you have 3 total, position the other 2 layers in the frames and merge them into one tube layer.
Adjust, Hue and Saturation both settings at 0, apply Xero, Porcelain with green and red settings at 0 and blue at 255, add a ds.
C/P full size tube as new layer and position to the right.
Now for the elements,% and then 50%
Element 064 (black branch) resize 35
Element 092 (wordart) resize 35% and then again 30%, c/p as new layer, free rotate 90 to the Left.
Element 054 (Ribbon) resize 35 % and then again at 40%
Element 013 (stars) resisze35% and then 30%
Element 065 (leaves) resize 35% and then 60%
Element 07 (bow) resize 35% twice
Hide the white background and merge all layers. resize your image 80%, go to adjust sharpen once.
Your all done, add your text and ©.
Thanks for trying my tut.
Free Blue

This tut assume your have a working knowledge of PSP.
Tube: Barbara Jensen you can purchase her tubes here.www.eroticartgallery.com
Mask:WSL Mask 19 you can find it here.
Template: by Dezignz By Ali template 108 you can find here
Shadow: 2,2, 50, 5
PSP Filters used:NONE .
sa-f-df= Select All, Float, Defloat.
sn=selelct none
c/p= copy & paste
In template delete the first 3 layers, we'll start at the bottom of the layers.
HIDE template layers as you finish a step.
Add a new layer again, open paper 02, resize to 800x800 pixels, copy and paste as a new layer, apply the mask and merge group.
Go to Shape 1 layer, sa-f-df-nl, resize Paper 01 to 800x800 pixels c/p into selelctions in your template, sn, add a drop shadow.
sn, add a drop shadow.
sn, add a drop shadow.
Select shape 4 copy layer and merge down, sa-f-df, open paper 2 and c/p as a new layer, selections invert and delete.
Adjust, add noise using these settings: Uniform and Monochrome checked setting 75, click OK.
Let's add the tube.
Select shape 3 again, sa-f-df, c/p your tube as a new layer, selections invert and hit delete, move this layer to just below
the Shape 2 layer, lower the opacity to about 68%.
LC-free Blue 1, resize 35% sharpen once and move to above your mask layer, duplicate and mirror.
LC-free Blue 14, resize 35@ twice, and then 80%, duplicate image mirror.
Thanks for trying my tut.

This tut assume your have a working knowledge of PSP.
Kit: Slow N Easy by Dee's Sign Depot, you can download here
Tube: FEATHERS by Ismael Rac/ www.xerac.com
Mask:Gemsmasks1191 you find here http://Gemstagginscraps.blogspot.com
Template: Missy_tagtemplate410 you can find here http://divineintentionz.blogspot.ca/
Fonts: MsMadi (#1b788d)
Shadow: 2,2, 50, 5
PSP Filters used:NONE .
sa-f-df-nl= Select All, Float, Defloat, New Raster Layer.
sa-f-df= Select All, Float, Defloat.
sn=selelct none
c/p= copy & paste
Let's begin & save often. Please refer to the finished tag for placement of elements, tubes etc..
Open your tube, masks, and template. Duplicate the template and close the orginal.
In template delete the following: "by missy" and the "stars", we'll start at the bottom of the layers.
HIDE template layers as you finish a step.
Let's begin, go to Image canvas size and increase the size to 900x550, unhide the bottom layer and flood fill with white.
Click on rectangle 1 layer. Add a new layer sa-f-df, c/p DD-SNE Paper5 Into Selections, sn.
Apply mask 161, merge group layers. Duplicate mask layer and Image Mirror, Layers Merge down.
Hi lite Rectangl 1 layer, sa-f-df-nl, c/p DD-SNE Paper2 Into Selections, sn add a drop shadow.
Repeat this step for rectangle 2 layer.
Select "rounded egde rec' layer, sa-f-df-nl, /cp DD-SNE Paper5 Into Selections, sn, add a drop shadow.
Repeat for "rounded edge rec 2" layer.
Select the "thin rectangle" layer, sa-f-df, c/p DD-SNE Paper 2 as new layer, move the paper slightly to the left, selections invert & delete.
Select the "frame back" layer, sa-f-df, c/p DD-SNE Paper3 as new layer, you will have to move the paper slightly to the left so that
the paper is within the selelction area, selections invert and delete.
Let's add the tube now.
Select the "frame" layer and using your magic wand tool click inside the left frame, selections, modify, expand by 3.
c/p the close of the the tube, position the tube, invert and delete, sn.
Move this tube layer to below the "frame" layer.
Repeat this step for the rest of the frame, I mirrored one of the tubes so they aren't all looking in the same direction.
Merge the 3 tube layers as 1, lower the opacity to 58.
c/p the full size tube as a new layer move this to the top and position.
Now for the elements, I used the following:
DD-SNE-element 2, c/p, move to the right and up slightly, duplicate & mirror the move this layer to the right just under the original
element 2 layer, merge these 2 layers together and move to just above your mask layer in your layers pallet, duplicate and Image Mirror.
DD-SNE element 10, c/p as new layer and position, duplicate this layer and position, merge down, move to just above mask layer.
DD-SNE element 12, c/p as new layer and positon, move this layer to just below the "frame back" layer.
DD-SNE element 18, c/p as new layer resize 40%.
DD-SNE element 19 c/p as new layer resize 20%. Duplicate layer 3 times and position.
DD-SNE element 24 c/p as a new layer, image mirror, move to the left.
DD-SNE element 6 c/p resize 20%
DD-SNE element 5 c/p resize 20%
DD-SNE WA 2, resize 40%
Hide the white background layer and merge visible. Resize all layers 80% sharpen once.
Add your copy right and text.
All done.
Happy New Year Freebie
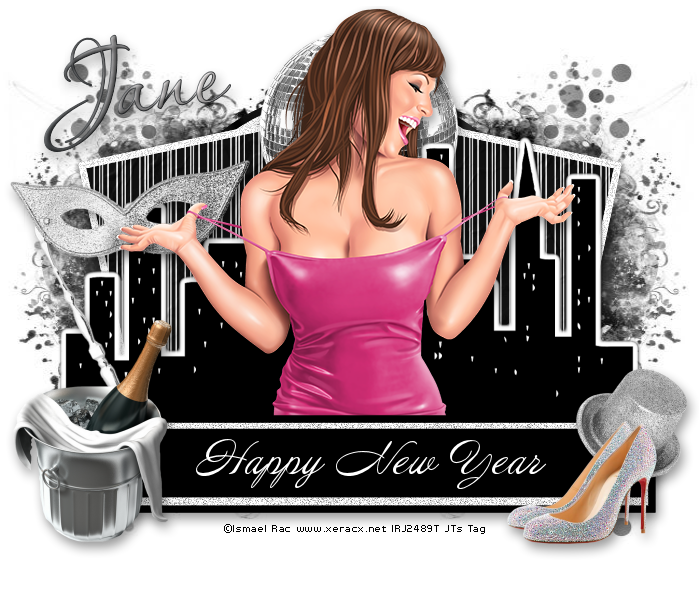
Happy New Year!
This tut assumes your have a Good working knowledge of PSP.
Kit: Ringing It In, designed by Wicked Princess you can download it here
Tube: BCA by Ismael Rac, even though it's a free tube you still need a Rac license to use this tube, you can download from here
Mask: By Vix, (431) 3rd one down on this page here
Template: by Aqua Rebel template 71 you can download from here
Fonts: Passions Conflict, it's a ROB font so I can't share.
Shadow: 2,2, 36, 6
Filters: Penta.com, Colour Dot, Lokas 3D Shadow, Use your favourite settings
PSP Filters used: None
sa-f-df-nl= Select All, Float, Defloat, New Raster Layer.
sa-f-df= Select All, Float, Defloat.
c/p= copy & paste
sa=select all
sn=select none
See finished tag for placement of tube/elements.
Let's begin.
Open your template, mask and tube in psp, duplicate your template and close the original.
In your template delete the following layers: 9 & 10.
Unhide the background layer so that you can see what you are doing, add a new layer, sa, c/p paper 9 into selections, sn, apply your mask layer and merge group.
Select Raster 1 layer, sa-f-df-nl, c/p paper 9 into selections, sn, hide template layer.
Select Raster 3 layer, apply PentaCom Colour Dot filter use spacing of 5.
Select Raster 5 layer, sa-f-df-nl, c/p paper8 into selections, sn, hide template layer, repeat this step for Copy of Raster 5 layer.
Stay on this layer
Let's add some elements!
C/p the Disco Ball as a new layer, resize 50%.
C/p City Scape as a new layer, resize 50%. Now you'll need to move the smaller rectangles so they are positioned just below the City Scape, see my tag.
C/p the Mask as a new layer resize 50% and position to the left.
C/p the Top Hat, resize 20%, make this your top layer and position to the right.
C/p the Champagne as a new layer, resize 50% position to the left.
C/p the Shoes, resize 25% position to the right.
Select the City Scape layer.
C/p your tube as a new layer, resize if needed.
Hide the background layer.
Add your copy right and text.
All done.
Merry Christmas Free

Click on preview for larger image.
Merry Christmas
This tut assumes your have a Good working knowledge of PSP & Animation Shop.
Tube: Rainbow Coffi, you have to be a member to download but well worth the time and it's free. here
Go to Rainbow Coffi link and in the Christmas list download the following:
Snowmen, 4th tube down in the left column. Trees, Left column bottom pair of trees. Snow, Left column third one down.
Animated snow here,
I'm not sure who's the original maker of this animation but it's been around for a few years. If you know or are the designer of this animation please email me I'd love to give you credit.
Fonts: Sunshine Poppy you can download here
Shadow: 2,2, 36, 6
Let's begin.
Open a new image 600x250.
Create a linear gradient using the colors A9BAC7 for the foreground and DAE1E7 for the background.
Flood fill your image.
Copy/paste the cloud tube as new layer, resize 50%, position to the left of your image dulpicate and mirror image.
Open your Tree tube, using the Free Hand selection tool (point to point) select around the tree on the left, selections invert.
Copy/paste this as a new layer in your image, resize 40%, sharpen once, positon to the left, duplicate layer, image mirror.
Go back to your tree tube and invert selectons again, copy/paste the Left tree as a new layer, resize 50%, sharpen once. Move this layer to below the Left tree layer.
Open your snow men tube and grey scale, go to Adjust, Colour Balance, Manual Colour Correction, source colour=d3d3d3, target colour=DAE1E7.
Copy/paste the snowmen as a new layer, resize 50%, postion slightly to the left of your image.
Add a drop shadow to the snowmen and tree layers.
Select the top layer, add a new layer flood fill with colour 3B4D5B, select all, float, defloat, selections Modify contract by 3 pixels, hit delete, add drop shadow, this is your frame layer.
Add your copy and text I used the same colour as the frame for my text.
Now for animation!
Open the snow animation in Animation Shop (AS), Edit Select All, keep selected.
In PSP hide your text and frame layer, copy merged, paste into (AS) as a new animation, duplicate the Frame so that you have 10 frames total.
Select the snow animation, Edit Copy, click on your New animation go to Edit Propagate Paste and the Edit Paste into Selected Frame, Left click you mouse once.
Go back to PSP, hide all layers except for the text and frame layers, copy merged and paste it into AS as a new animation.
Duplicate the number of frames until you have 10 frames, Edit Select All, Edit Copy.
Activate the animation you made before and got to Edit Select All, Edit Propagate Paste, Edit Paste Into Selected Frame, Left click your mouse once, run your animation and if your happy save as a GIF.
All done.
Christmas Freebie
 Click on preview to see larger.
Winter Time FTU
 Winter Time
This tut assumes your have a Good working knowledge of PSP.
Kit: Winter Time by Mago74 can be found here
Tube: Ismael Rac you can purchase here.
Mask:HorsePlay's Pasture mask 9 here
Template: None
Fonts: Respective Slanted you can download here
Shadow: 2,2, 36, 6
Filters: None
PSP Filters used: None
sa-f-df-nl= Select All, Float, Defloat, New Raster Layer.
sa-f-df= Select All, Float, Defloat.
c/p= copy & paste
sa=select all
sn=select none
See finished tag for placement of tube/elements.
Let's begin.
Open your tube in psp, I changed the colour of the sweater using colour manipulation. Source colour # C0C0C0, Target colour # A7030A.
Open Winter magic cluster frame 2, resize 25% all layers.
Add a new layer, sa.
Open paper 1 and resize to 800x800 pixels and sharpen once, copy and paste paper1 into selelctions in your cluster image, apply your mask, merge group.
Copy and paste tube close up as new layer, resize by 70%, duplicate and move the duplicate layer below the cluster frame layer.
On the orginal tube layer erase any part of the tube that overlaps the bottom of the frame.
Add a dropshadow (make sure that Shadow On New Layer is checked) to this layer.
You will see the shadow at the bottom of the top tube, use your erasor again to erase the shadow that is showing. On this shadow layer add another drop shadow, this time uncheck Shadow on new layer.
Open Circled wordart resize 25%, c/p as top layer on your cluster, use your erasor to erase any word art that is on top of the decorations at the bottom of the cluster.
Add your copy right and text.
For the stats I opened a new image 600x250 or 150x150 c/p one of the papers as a new layer, then c/p the finished tag as a new layer resizing & sharpening so that they fit the image nicely, added a border and an element or 2, then added my initial and I was done.


Let It Snow FTU

Let it Snow
This tut assumes your have a Good working knowledge of PSP.
Kit: by Wicked Princess Scraps, All It's Glory you can download it here
Tube: Ismael Rac, you can purchase this tube here
Mask: MC_Mask19 by Melissa'z Creationz, you can download it here
Template: MC_ChristmasTemp4 by Melissa'z Creationz, you can download it here
Fonts: Santa's Sleigh, you can download here
Shadow: 2,2, 36, 6
Filters: DSB Noise, Penta Com Color Dot,
PSP Filters used: None
sa-f-df-nl= Select All, Float, Defloat, New Raster Layer.
sa-f-df= Select All, Float, Defloat.
c/p= copy & paste
sa=select all
sn=select none
See finished tag for placement of tube/elements.
Let's begin.
Open your tube, template, and mask in PSP. Duplicate the template and close the original.
Before I started I changed the colour of the outfit worn by the tube (this is allowed) go to Adjust, Colour Balance, Manual Colour Correction, Source colour=1C1C1, Target Colour=7B9C45. You can also use the green outfir already supplied in the tube.
In the template delete the Credits layer.
Select the bottom layer in the template add a new layer, move to the bottom and flood fill white.
Add a new layer, sa, c/p pp7 into selelctions, sn.
Apply your mask and merge group, aplly DSB Bright Noise use settings 37-Mix.
Open pp1, go to Image Rotate, Free Rotate 90° Right, in the template select Raster 3 layer, sa-f-df, c/p pp1 as new layer, selections invert hit delete, sn.
Select Copy of Raster 3 Layer in the template, sa-f-df, c/p pp1 as new layer Image Mirror, selections invert and hit delete, sn.
Select Raster4 layer, sa-f-df-nl, flood fill this area with colour # 603A27, sn, delete template layer, apply PentaCom Color Dot use Value=55 and Distance=5 rest of the settings use default.
Repeat the above step for Copy of Raster 4 layer.
Select Raster 2 layer, sa-f-df-nl, c/p pp6 into selections, sn.
Select Bottom Merged Layer, (white frame) add DSB Bright Noise setting at 45-Mix.
Select next Merged layer up, (red squares) sa-f-df-nl, flood fill with 603A27.
Select the 3rd merged layer from the top (black frames) sa-f-df-nl, flood fill with colour # 362116, sn, delete template layer, apply PentaCom Color Dot use Value=59 and Distance=2 rest of the settings use default.
Select the top Merged layer (text) sa-f-df-nl, flood fill each letter with colour # 362116, you may have to zoom in a bit, sn, delete template layer.
Select Raster 2 layer again, sa-f-df, c/p tube as new layer, position inside selection invert delete, you will have to erase anything showing in the bottom square, move to below the White frame layer, lower the opacity to 48 .
C/P your tube as a new layer, Image Mirror & position to the right.
Time to add your elements, I used the following:
Pinecone @ 50%
Ribbon Tree @ 50%
Ribbon @ 40%
WoodSnowman @ 40%
MouseCone @ 30%
Citrus @100%, c/p as new layer, erase all but the 2 on the far right
Add your copy right and name.
For my name I used colour 362116 in foreground and colour E3D5AD in th background, add a simple inner bevel using te following settings:
Shape # 4
Width=20
Smoothness=50
Depth=47
Ambience=13
Shininess=50
Angle=0
Intensity=30Elevation=60
Colour # CBAE69
All done, thanks for trying my tut.
Soul Catcher FTU Tubes & Kit

Soul Catcher
This tut assumes your have a Good working knowledge of PSP.
Kit: Goth This, by A Taggers Scrap you can download this awesome kit here
Tube: Anne Stokes 2 tubes for this tut, these are FTU tubes I downloaded them at
Mask:Vix-BigMask019 here, WSL_HalloweenMask1 here
Template: Missy_tagtemplate331
Fonts: P22 Corinthia (Rob font) sorry it's a pay font, or any simple script font will do.
Shadow: 2,2, 36, 6
Filters: None
PSP Filters used: None
sa-f-df-nl= Select All, Float, Defloat, New Raster Layer.
sa-f-df= Select All, Float, Defloat.
c/p= copy & paste
sa=select all
sn=select none
See finished tag for placement of tube/elements.
Let's begin.
Open your tubes and template and masks.
Duplicate the template and cloase the original. In the template delete the credits layer.
Select the background layer and add a new layer, c/p paper 3 as a new layer. Apply Vix mask (i cropped some of the black off first) merge group.
C/P the same paper as a new layer and apply the WSL mask, merge group and add a drop shadow.
Select Glitter Rectangle 1 Left layer, sa-f-df-nl, c/p paper 3 into selections, sn. Duplicate layer, image mirror.
Delete Glitter Rectangle 2 Right layer
Select Rectangle Center layer, sa-f-df, c/p paper 9 as new layer, selections invert, hit delete, sn.
Repeat above step for Circle Right and Circle Left layers.
Select Frame Back ground layer, sa-f-df-nl, c/p paper 2 into selections, sn.
C/P your tubes see finished tag for placement.
Add your elements I usd the following:
Glyph, use the deform tool to stretch it out fit in the circle.
Rose, I deleted the large leaf from the rose so that you could see the praying hands.
Wings
Wire @ 60%, rotate image 90
Add any text you like
Add your copy right and name.
All done.
Perfect Scare FTU
 This tag is dedicated to one of the greatest taggers out there.
Bev Herr, I just love her tags they are so hauntingly beautiful.
So I made this tag/tut emulating her style.
I hope you like it Bev.
Perfect Scare
This tut assumes your have a Good working knowledge of PSP.
Kit: The Perfect Scare, by Bev at HorsePlay's Pastures an absolutely gorgeous kit.
Thank you so much for your generosity xoxo
Tube: by Zindy, you can purchase this tube and others here
Mask: by me just click on the image and right click to save.

Template: by Punkybutts Template 96, you can download this template here.
Fonts: JellyKa Delicious Cake you can download here
Shadow: 2,2, 36, 6
Filters: None
PSP Filters used: None
sa-f-df-nl= Select All, Float, Defloat, New Raster Layer.
sa-f-df= Select All, Float, Defloat.
c/p= copy & paste
sa=select all
sn=select none
See finished tag for placement of tube/elements.
Let's begin.
Open your tube and template, duplicate the template and close the original.
In the template delete the first 13 layers.
Select the background layer flood fill white, sa, new layer, c/p paper2 into selections.
Deselect and apply your mask, merge group.
Select the Circle Dots layer, sa-f-df-nl, c/p paper8 into selections, sn, delete template layer.
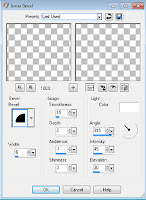
Repeat the above step for all the frame layers adding an Inner Bevel to each frame using these
settings:
Select the Square layer, sa-f-df-nl, c/p paper6 into selections, sn.
Select the Large Circle layer, sa-f-df, c/p paper 6 as new layer, move your paper to your liking,
selections invertand hit delete.
Select the Right Circle, sa-f-df, c/p paper 4 as a new layer, position paper, selections invert hit delete.
Repeat above step for Left circle.
Select Center Circle, sa-f-df-nl, c/p paper 4 into selections, sn.
Delete all the template layers.
Copy and paste your tube, I resized mine 80%.
Add your elements, I used the following:
Element 42, @ 80%
Element 28 @ 30%
Element 10 @ 80% X2, c/p position to the left, duplicate and mirror.
Element 19 @ 40% X2
Add your copy right and text.
For the text I used Black foreground and paper 10 as my background pattern.
All done.
Suhweet!! FTU

Suhweeet!
This tut assumes your have a Good working knowledge of PSP.
Kit: Candy Treats by Kittz Kreationz she has some awesome freebies!
Direct link to kit page here
This special is only available until October 31st, 2011
Mask:None
Template:Pbs-Template136 which you can get here
Fonts:Aquarelle you can get if here
Shadow: 2, 2, 36, 6
Filters: Noise filter of choice. Xero Porcelain
PSP Filters used: Add & Remove Noise filter
sa-f-df-nl= Select All, Float, Defloat, New Raster Layer.
sa-f-df= Select All, Float, Defloat.
c/p= copy & paste
sa=select all
sn=select none
See finished tag for placement of tubes and elements.
Let's begin.
Open you tube and template.
Flood fill the background layer with white so you can see what your doing, you can delete this layer at the end.
Select square bottom layer, sa-f-df-nl, c/p paper 8 into selections, sn, delete template layer.
Repeat above step for square top, and square rotate right layers.
For all the frame layers apply your fav noise filter, I used DSB Bright Noise set @ 34 Mix, for those without DBS you can use the Adjust, Add Noise filter in PSP
Use your magic wand to select the Right Circle layer, c/p paper 3 into selection, sn.
Repeat above step for the Left Circle layer and keep selected for next step.
If you are using the same tube c/p layer1 (or close up of tube) as a new layer position,
C/P the Candy wordart, c/p Layer1 of your tube and resize 75%, Adjust Sharpen once.
Add your elements, you can use my finished tag as a reference but there are so many terrific elements in this kit you may feel like adding less or more, this part I leave up to you.
For the text I used Paper2 as my background pattern and white in the foreground,
Add your copy right.
All done.
Spooktacular FTU

Spooktacular!
This tut assumes your have a Good working knowledge of PSP.
Kit: Monster Ball VIP Room, by Digicats, you can download it here
Tube: Elias Chatzoudis, pte4172, Pumpkinella you can purchase from here
Mask:Vix_Halloween2010No1, you can download from here
Template:Missy_tagtemplate288, you can download here
Fonts:LD Jilly Nilly, you can download here.
Shadow: 2, 2, 36, 6
Filters: DSB, Bright Noise or your favourite noise setting in PSP, Pentacom, Jeans
PSP Filters used: Noise
sa-f-df-nl= Select All, Float, Defloat, New Raster Layer.
sa-f-df= Select All, Float, Defloat.
c/p= copy & paste
sa=select all
sn=select none
Let's begin.
Open your tube and template.
In your template delete the first 5 layers and the Glittered rectangle layer.
Increase your canvas size to 650x650, flood fill the background layer with white so you can see what you're doing.
Add a new layer and flood fill black, apply your mask and merge group.
Select your square layer, click once with magic wand. c/p paper04 into selections, sn.
Apply Pentacom Jeans using these settings, Amount 58, Borderwidth 2, Interval 2.
Select Glittered Oval1 layer, sa-f-df-nl, c/p paper02 into selelctions,sn, delete template layer.
Apply DSB Bright Noise, setting 43, Mix or your favourite PSP noise setting will do.
Repeat these steps for the Glitter Frame Layer.
Select Oval layer, click once with magic wand add a new layer and flood fill with gradient use
884879 Foreground & DF9669 Background colours set at 45 degrees, apply Pentacom, Jeans using these settings, Amount 58, Borderwidth 2, Interval 2.
Select the Circle layer, click with your magic wand add a new layer and flood fill with your gradient but with the angle set at 224.
Keep selected.
Change to Blend mode to Overlay.
Select the Frame background layer, click once with magic wand, c/p paper2 as a new layer, selections invert and hit delete.
Selections Invert again. C/P your 2nd Tube layer as a new layer,
Add your elements, you can use my tag as a guide.
Add your copy right and text.
All done.
WitchyPoo FTU

Halloween
This tut assume your have a Good working knowledge of PSP.
Kit: None
Tube: Keith Garvey, you can purchase his tubes here.
Mask:Vix_Halloween2010No1, Mask Set 1 on Vix's blog you can find here.
Template:None
Cluster Frame:from Dessi Designs Depot.
Fonts:Gorestep, you can find here
Shadow: 3,3, 36, 6
Filters: None
PSP Filters used: None
sa-f-df-nl= Select All, Float, Defloat, New Raster Layer.
sa-f-df= Select All, Float, Defloat.
c/p= copy & paste
sa=select all
sn=select none
Let's begin.
Open your template delete the credits,bg1 &bg2 layers.
Click on background layer and add another layer, flood fill with black.
Apply your mask and merge group.
Using magic wand click inside the top frame, modify your selections, expand by 7, c/p 1 tube as new layer.
Position tube and invert selections and hit delete.
Movethe frame layer up above your tube layer in the layer pallet.
Repeat this step with the other frame using another tube.
C/P your last tube and position.
Add your copy right and text.
All done.
Spookalicious FTU

Spookalicious
This tut assume your have a Good working knowledge of PSP.
Kit: Ookie Spooky, by Kittz Kreationz you ca get it here.
Tube: Elias Chatzoudis, you can purchase here.
Mask: MC_Mask16, by Mellisa's Creationz you can get it here.
Template: AR315_Template59, by Aqua Rebel you can get it here.
Fonts:The Nautical Gal, pay font
Shadow: 3,3, 36, 6
Filters: None
PSP Filters used: None
sa-f-df-nl= Select All, Float, Defloat, New Raster Layer.
sa-f-df= Select All, Float, Defloat.
c/p= copy & paste
sa=select all
sn=select none
Let's begin.
Open your tube and template.
In the template delete the first 3 layers and the Go Away layer.
Click on the background layer and add a new layer, sa, c/p p3 into selections.
Select the Halftone layer, sa-f-df-nl, c/p P2 into selelctions, sn, hide template layer.
Move your new halftone layer to the left of your image, duplicate and mirror.
Select Glitter Strip 1, greyscale this layer (Adjust, Hue & Sat set to 0)
Go to Adjust, Colour balnce, manual colour correction, Source colour# 959595,
Repeat this step for the Rectangle 2, Glitter Strip 2, and Gradient Circle layers.
Select the Strip 1 layer, sa-f-df, c/p P4 as a new layer, selelctions invert and hit delete.
Repeat this step for Rectangle 1 & 3, and Strip 2 layers.
Select Shape 1, sa-f-df, c/p P2 as new layer, selections invert and hit delete,
Select the Black circle layer, sa-f-df-nl, c/p P5 into selections, sn, hide the template layer.
C/P your tube as a new layer, move to the top of your layer pallet. I resized my tube 80%.
Add your elements.
Wordart @ 80%
Star Dangle @ 40%
Broom @ 80%
Skull Brad @ 50%
SpiderWeb
Sparkles
Spiderweb Brad @ 50%
Add your copy right and text.
All done.
Scream My Name FTU

Scream My Name
This tut assume your have a Good working knowledge of PSP.
Kit: by KittzKreations, you can get it here.
Tube: Keith Garvey, Glitter-PTE0972 you can get it here.
Mask: Melissa's Creationz, MC_Mask11, you can get it here.
Template:Temp-175, you can get it here. She has her templates listed on the left.
Fonts:Sunshine Poppy, you can get here
Shadow: 3,3, 36, 6
Filters: DSB, Bright Noise, settings 33, Mix
PSP Filters used:
sa-f-df-nl= Select All, Float, Defloat, New Raster Layer.
sa-f-df= Select All, Float, Defloat.
c/p= copy & paste
sa=select all
sn=select none
Let's begin.
Open tube and template, duplicate the template and close the original.
Delete the credits layer.
Image, Canvas size 600x600.
Select bottom layer and add a new layer, move this layer to the bottom of
the layer pallet, sa, c/p P8 into selections, sn, apply mask and merge group.
Select Pink Square 2 layer, sa-f-df-nl, c/p 7 into selections, sn, hide template layer.
Repeat this step for the other pink square layer.
Select the Black Circle layer, sa-f-df, c/p p8 as new layer, selections invert hit delete.
Select WordArt layer, greyscale this layer, (Adjust, Hue & Sat both at 0)
Go to Adjust, Colour Balance, Manual colour Correcton,
Using magic wand click inside White Frme layer, C/P your tube (layer 1) as new layer,
C/P Layer 1 in your tube layers as a new layer and move slightly to the right.
Duplicate the Wordart layer and move this layer above the tube layer you just added,
Add your elements.
Add your copy right and text.
All done.
BST Forum
