Rebecca Sedwick Collab
Let's Chat!
Enter Block content here...
Lorem ipsum dolor sit amet, consectetur adipiscing elit. Etiam pharetra, tellus sit amet congue vulputate, nisi erat iaculis nibh, vitae feugiat sapien ante eget mauris.
Sunday, April 17, 2011
Peaceful Tutorial
10:06 AM
| Posted by
Jane

For this tut I used the wonderful artwork of Zindy Nielsen you can find her artwork here
It's a free tube but still needs a license # to use it.
Thank you Zindy
The kit I am using is my Peaceful kit that you can get here
It's on sale until April 30th .99 cents.
I used 2 masks for this tut, Vin Mask # 431 & 451 here
Thank you Vin
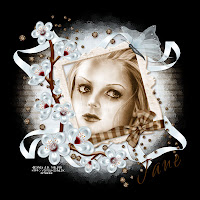
For placement of elements please refer to tag above.
New Image 600x600
Copy & paste paper 4 as a new layer apply mask 431 and merge group.
Copy & paste paper 16 as new layer apply mask 451 merge group.
Change blend to Hard Light.
Copy & paste frame 3 as new layer re size 60%.
Magic wand click inside frame, modify, expand 3.
Copy and paste tube as new layer, position tube, invert and delete.
Move frame layer above tube and merge down.
Add drop shadow of choice
Adjust to grey scale and change to a lighter brown using manual colour change.
Use Raster Deform tool to turn frame on an angle.
Copy & paste Wrap 2 re size 60% 3 times.
Adjust position using Raster Deform tool.
Add drop shadow.
Copy & Paste Blossom 1 as new layer, position and re size 60%.
Add drop shadow of choice.
Copy & paste Butterfly 1, re size 60% and position.
Select top mask layer and copy & paste Scatter 1 re size 50%.
Delete any part of the scatter layer that you do not want showing.
Add a drop shadow.
Copy and paste Ribbon 3 and re size 40%, duplicate layer and mirror and then flip.
Add a drop shadow to both ribbon layers.
Add copy right.
Save as PNG or Jpeg
Thank you for trying my tut.
Subscribe to:
Post Comments
(Atom)


 >
>


2 comments:
Just a quick note to let you know that a link to this post will be placed on CraftCrave in the Graphics category today [18 Apr 01:00am GMT]. Thanks, Maria
TY♥