Rebecca Sedwick Collab
Let's Chat!
Enter Block content here...
Lorem ipsum dolor sit amet, consectetur adipiscing elit. Etiam pharetra, tellus sit amet congue vulputate, nisi erat iaculis nibh, vitae feugiat sapien ante eget mauris.
Sunday, July 24, 2011
Picture Me
2:01 PM
| Posted by
Jane
 This tutorial was created by me, any similarities to other tutorials is coincidental.
I used the wonderful artwork of Anna Marine, you can find her tubes at CDO.
The kit I used was Dark Side Of The Moon, created by Gothic Inspirations.
Mask by WSL, (WSLMask 60) you can find here.
Font used Ringbearer you can find here.
Let's begin.
New image 700x700.
Copy & paste Frame 5 as new layer, resize 80%.
Use magic wand select inside frame, Selections, Modify, Expand by 8.
Copy & paste your tubes as new layer, Selections, Invert hit delete, Deselect.
Move your tube layer below the frame add a small drop shadow to your tube layer.
Use magic wand select inside frame, Selections, Modify, Expand by 8.
Add new layer, copy & paste Mist (in elements folder) Into Selection, Deselect.
Move Mist layer below the tube layer.
Select top layer.
Open Ribbon 3, resize 80%, copy & paste as new layer and position.
Using Raster Deform Tool push the left side of the ribbon to line up with the edge of the Frame, repeat for the right side of the ribbon.
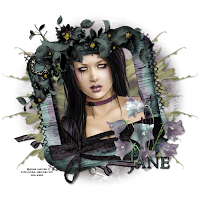
See finished tag.
Layers Merge Visible. Free Rotate your Frame 15 to the Left, add drop shadow.
New Raster Layer, move below your merged layer.
Select All, copy & paste Paper 8 Into Selection, Deselect.
Add New Mask Layer and merge group.
Open Wings, resize 85%, copy & paste as New Layer.
Open Ribbon 1 resize 65%, copy & paste as new layer, move to the bottom left corner of Frame, see finished tag.
Select top layer, open Flowers resize 50%, copy & paste as new layer move to bottom right corner of Frame, add a drop shadow.
Open Charm, resize 25% copy & paste as new layer position at top Left side of Frame.
Open Corner Floral, resize 50% copy & paste as new layer position just to the right of the Charm. See finished tag.
Add copy rights and license number.
Add your name, use black in the forground, and Paper 5 as your pattern fill set at 0 Angle, 70 as the Scale.
I used 1.5 for my Stroke (Thanks Bev, this is a good setting to use to still see the black outline on the font).
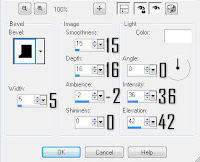
Add an Inner Bevel to the text I used the following.
 In the tag above I made the Ribbon look like it was lying over the first Initial.
To do this duplicate the Ribbon 3 layer and move it to the top of your layers pallet.
Use your erasor tool to erase the ribbon from the Right side of your first initial.
Then erase any of the ribbon remaining on the Left side of your first initial.
Add a drop shadow to the original Ribbon 3 layer and also to your name.
Done, thanks for trying my tut.
Subscribe to:
Post Comments
(Atom)


 >
>


0 comments:
Post a Comment