Rebecca Sedwick Collab
Let's Chat!
Enter Block content here...
Lorem ipsum dolor sit amet, consectetur adipiscing elit. Etiam pharetra, tellus sit amet congue vulputate, nisi erat iaculis nibh, vitae feugiat sapien ante eget mauris.
Saturday, October 15, 2011
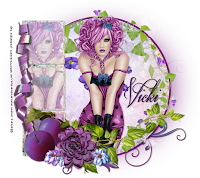
Sweet Connection PTU
10:52 AM
| Posted by
Jane

Sweet Connection
This tut assumes your have a Good working knowledge of PSP.
This is the first of many tuts working as CT for Gemini Creationz.
Kit: Sweet Connection by Gemini Creatioz you ca purchase her kit here
She's having a 40% off sale for the month of October!
Tube: Exclusive tube Burlesque by Barbara Jensen you can purchase the tube here
Mask: Bev Herr Mask 20 you can download here
Template:Crazy Sexy Cool by Crazy Cakes Scraps you can download it here
Fonts: Respective, which you can get here
Shadow: 2,2, 36, 6
Filters: DSB, Bright Noise you can also use the noise filter in PSP
PSP Filters used: Noise
sa-f-df-nl= Select All, Float, Defloat, New Raster Layer.
sa-f-df= Select All, Float, Defloat.
c/p= copy & paste
sa=select all
sn=select none
See finished tag for placement of tube/elements.
Let's begin.
Open tube, template and mask in psp.
For the tube I recoloured some of the items (this is allowed) the colours I used were #712361 (purple) and 35557e (blue).
I greyscaled the items first the did manual colour correction in psp.
I chose a darker grey for the source colour # 4B4B4B.
In your template delete the following: Vector 1 layer, text and Raster 4 layers.
Select Raster 2 layer, add a new layer and move it to the bottom of th layer pallet, flood fill white, just so that you ca see the effects as you add them to your tag.
Add a new layer, sa, C/P paste paper 16 into selections, sn, apply your mask and merge group.
Apply DSB Brght Noise filter setting 56_Mix.
Select raster 2 layer, sa-f-df-nl, C/P paste paper 16 into selections, sn.
Select Raster 3, sa-f-df-nl, c/p paper 5 into selelctions, sn.
Select Raster 1 layer, sa-f-df-nl, sa-f-df-nl, C/P paste paper 5 into selections, sn.
Select BOTTOM merge layer (there are 2 merged layers), sa-f-df-nl, c/p paper 12 into selections, sn.
Select TOP Merged layer, sa-f-df, c/p paper12 as a new layer, selelction invert and hit delete.
C/P your tube as new layer. Trim if needed.
Select the Top Merged layer again, sa-f-df, c/p your tube as a new layer and position over the selections, invert selection and hit delete.
Lower the opacity to 42%
Add your elements, I used the following:
Fancy Swirl2 @ 100%
Flower Scatter @ 85%
Greenery 2 @ 100%
Circle Flowers @ 100%
Plum @ 30%
Fabric Flower 2 @ 30% duplicate layer and position.
Fabric Flower @ 35%
Flower Scatter @ 100%
Shiny Streamer @ 100%
Add your copy right and text.
All done.
Subscribe to:
Post Comments
(Atom)


 >
>


0 comments:
Post a Comment