Rebecca Sedwick Collab
Let's Chat!
Enter Block content here...
Lorem ipsum dolor sit amet, consectetur adipiscing elit. Etiam pharetra, tellus sit amet congue vulputate, nisi erat iaculis nibh, vitae feugiat sapien ante eget mauris.
Sunday, November 13, 2011
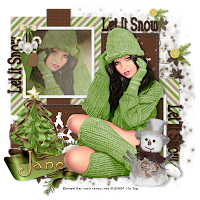
Let It Snow FTU
9:50 AM
| Posted by
Jane

Let it Snow
This tut assumes your have a Good working knowledge of PSP.
Kit: by Wicked Princess Scraps, All It's Glory you can download it here
Tube: Ismael Rac, you can purchase this tube here
Mask: MC_Mask19 by Melissa'z Creationz, you can download it here
Template: MC_ChristmasTemp4 by Melissa'z Creationz, you can download it here
Fonts: Santa's Sleigh, you can download here
Shadow: 2,2, 36, 6
Filters: DSB Noise, Penta Com Color Dot,
PSP Filters used: None
sa-f-df-nl= Select All, Float, Defloat, New Raster Layer.
sa-f-df= Select All, Float, Defloat.
c/p= copy & paste
sa=select all
sn=select none
See finished tag for placement of tube/elements.
Let's begin.
Open your tube, template, and mask in PSP. Duplicate the template and close the original.
Before I started I changed the colour of the outfit worn by the tube (this is allowed) go to Adjust, Colour Balance, Manual Colour Correction, Source colour=1C1C1, Target Colour=7B9C45. You can also use the green outfir already supplied in the tube.
In the template delete the Credits layer.
Select the bottom layer in the template add a new layer, move to the bottom and flood fill white.
Add a new layer, sa, c/p pp7 into selelctions, sn.
Apply your mask and merge group, aplly DSB Bright Noise use settings 37-Mix.
Open pp1, go to Image Rotate, Free Rotate 90° Right, in the template select Raster 3 layer, sa-f-df, c/p pp1 as new layer, selections invert hit delete, sn.
Select Copy of Raster 3 Layer in the template, sa-f-df, c/p pp1 as new layer Image Mirror, selections invert and hit delete, sn.
Select Raster4 layer, sa-f-df-nl, flood fill this area with colour # 603A27, sn, delete template layer, apply PentaCom Color Dot use Value=55 and Distance=5 rest of the settings use default.
Repeat the above step for Copy of Raster 4 layer.
Select Raster 2 layer, sa-f-df-nl, c/p pp6 into selections, sn.
Select Bottom Merged Layer, (white frame) add DSB Bright Noise setting at 45-Mix.
Select next Merged layer up, (red squares) sa-f-df-nl, flood fill with 603A27.
Select the 3rd merged layer from the top (black frames) sa-f-df-nl, flood fill with colour # 362116, sn, delete template layer, apply PentaCom Color Dot use Value=59 and Distance=2 rest of the settings use default.
Select the top Merged layer (text) sa-f-df-nl, flood fill each letter with colour # 362116, you may have to zoom in a bit, sn, delete template layer.
Select Raster 2 layer again, sa-f-df, c/p tube as new layer, position inside selection invert delete, you will have to erase anything showing in the bottom square, move to below the White frame layer, lower the opacity to 48 .
C/P your tube as a new layer, Image Mirror & position to the right.
Time to add your elements, I used the following:
Pinecone @ 50%
Ribbon Tree @ 50%
Ribbon @ 40%
WoodSnowman @ 40%
MouseCone @ 30%
Citrus @100%, c/p as new layer, erase all but the 2 on the far right
Add your copy right and name.
For my name I used colour 362116 in foreground and colour E3D5AD in th background, add a simple inner bevel using te following settings:
Shape # 4
Width=20
Smoothness=50
Depth=47
Ambience=13
Shininess=50
Angle=0
Intensity=30Elevation=60
Colour # CBAE69
All done, thanks for trying my tut.
Subscribe to:
Post Comments
(Atom)


 >
>


2 comments:
Just a quick note to let you know that a link to this post will be placed on CraftCrave in the DigiFree category today [14 Nov 02:00am GMT]. Thanks, Maria
Love this and would like to try it, but can't get the kit. I don't have a FB account.