Rebecca Sedwick Collab
Let's Chat!
Enter Block content here...
Lorem ipsum dolor sit amet, consectetur adipiscing elit. Etiam pharetra, tellus sit amet congue vulputate, nisi erat iaculis nibh, vitae feugiat sapien ante eget mauris.
Sunday, November 6, 2011
My Blue Christmas PTU
3:39 PM
| Posted by
Jane

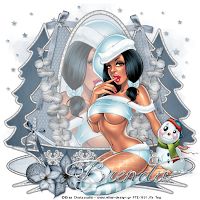
My Blue Christmas
This tut assumes your have a Good working knowledge of PSP.
Kit: My Blue Christmas by CuddleBees Designs you can purchase this kit at LollipopsNGumdrops.
This is a full sized kit so papers will have to be resized before using them.
Resize your papers to 800x800 pixels, elements should be resized 35% and sharpened once before following each step that involves an element from the kit.
Tube: Elias Chatzoudis pte-1663, you can purchase here
Mask: HorsePlay's Pasture Mask 19, you can download it here.
Template: by Designs by Vaybs, Vaybs_MisfitXmas5 you can download here near bottom of page.
Fonts: JellyK Delicious Cakes you can download here
Shadow: 2,2, 36, 6
Filters:
PSP Filters used: Noise filter
sa-f-df-nl= Select All, Float, Defloat, New Raster Layer.
sa-f-df= Select All, Float, Defloat.
c/p= copy & paste
sa=select all
sn=select none
See finished tag for placement of tube/elements.
Let's begin.
Open your tube, mask & template, duplicate the template and delete the credits & wordart layers.
Select the background layer and add a new layer, sa, (resize paper 800x800 pixels and sharpen once) c/p paper 6 into selections, sn, apply your mask and merge group.
Select Raster 1 layer, sa-f-df-nl, open paper 13 resize to 800x800 pixels, sharpen, c/p into selection on your new image, sn, add your favourite noise filter settings, I used Gaussian, Monochrome setting it at 45.
Open paper 10, resize 800x800 pixels.
In your template select Raster 2, go to Adjust, Hue & Saturation, settings at 0, sa-f-df, selections modify contract by 8.
Add a new layer, c/p paper 10 into selections, sn.
Repeat the above steps for the Raster 4 layer using paper 10.
Repeat again for rasters 3 and 5 using paper 7, remember to resize paper 7 first.
Select Raster 7, go to Adjust, Hue & Saturation settings at 0.
Select Raster 6, sa-f-df, c/p paper 10 as new layer, selections invert and hit delete, sn, hide your template layer for now.
Select Raster 8, sa-f-df-nl, c/p paper 8 into selections, sn.
Select Raster 9, go to Adjust, Hue & Saturation, settings at 0.
Select Raster 10, go to Adjust, Hue & Saturation, settings at 0.
While still in Raster 10, sa-f-df, selections modify contract by 8, add a new layer, c/p paper 10 into selections, sn.
Ok now you're ready to add your tube.
Select Raster 6 layer, sa-f-df, c/p the close up of your tube as a new layer, selections invert and hit delete, lower the opacity to 50.
C/P your tube as a new layer, positon.
Time to add your elements, I used the following:
Hanging Ornament @35% x2
Flower1 @35% x2
White Branch @ 35% x2, duplicate and mirror image.
Flower2 2 35% and then 50%
Add your copy right and text.
All done.
Subscribe to:
Post Comments
(Atom)


 >
>


1 comments:
Just a quick note to let you know that a link to this post will be placed on CraftCrave in the DigiFree category today [07 Nov 02:00am GMT]. Thanks, Maria