Rebecca Sedwick Collab
Let's Chat!
Enter Block content here...
Lorem ipsum dolor sit amet, consectetur adipiscing elit. Etiam pharetra, tellus sit amet congue vulputate, nisi erat iaculis nibh, vitae feugiat sapien ante eget mauris.
Sunday, November 27, 2011
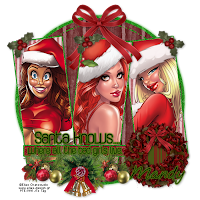
Santa Knows PTU
8:55 AM
| Posted by
Jane

Santa Knows
This tut assumes your have a Good working knowledge of PSP.
Kit: A Beary Merry Christams by Diva's Designs you can purchase it here
Thanks Mandy for letting me use this gorgeous kit for this tut.
Tube: Elias Chatzoudis, I used different tubes, you can purchase here
Mask: None
Template: by DeesDesignsDepot you can download here
Fonts: of choice I used OoohBaby which is a Rob font.
Shadow: 2,2, 40, 10
Filters: DSB Bright Noise, EyeCandy 5 Gradient Glow
PSP Filters used: None
sa-f-df-nl= Select All, Float, Defloat, New Raster Layer.
sa-f-df= Select All, Float, Defloat.
c/p= copy & paste
sa=select all
sn=select none
See finished tag for placement of tube/elements.
Let's begin.
Open tube and template in psp, duplicate the template and close the original.
In the template delete the credits, Top Purple Circle and Top White Circle layers.
Select Large White Circle layer, sa-f-df-nl, c/p paper 8 into selections, sn, apply DSB Bright Noise settings 45-Mix, hide template layer.
Repeat the above step for the following layers, Dot N Dash, for all 3 purple rectangles and White Strip layer.
Duplicate Raster 1 Layer, on original Raster 1 layer go to Adjust Blur, Gaussian Blur, use 4 as your setting.
Select the Large Mauve Circle layer, sa-f-df-nl, c/p paper2 into selections, sn, hide template layer.
Select Purple Strip layer, sa-f-df-nl, c/p paper 7 into selections, sn, apply DSB Bright Noise same settings as before, hide template layer.
Repeat the above steps for Bottom Purple Circle layer.
Select the Mauve Left Rectangle layer, sa-f-df-nl, c/p paper 4 into selections, keep selected, c/p first tube as new layer, position, invert selections and hit delete, hide template layer.
Repeat these steps for each Mauve Rectangle using a different tube for each rectangle.
Select Bottom White Circle, sa-f-df-nl, c/p paper 9 into selections, sn, hide template layer.
Select Word Art layer, apply EyeCandy 5 Gradient Glow, I used the Subtle White Glow settings, set the Glow radius to 5, colour used #528713
Now for the elements, I used the following:
Bow 2 @ 40%, duplicate this layer and resize again 40% for over the wreath.
Wreath @ 35%
Bell Decoration @50%
Holly @ 15%
Add your copy right and text.
All done.
Subscribe to:
Post Comments
(Atom)


 >
>


0 comments:
Post a Comment