Rebecca Sedwick Collab
Let's Chat!
Enter Block content here...
Lorem ipsum dolor sit amet, consectetur adipiscing elit. Etiam pharetra, tellus sit amet congue vulputate, nisi erat iaculis nibh, vitae feugiat sapien ante eget mauris.
Monday, September 12, 2011
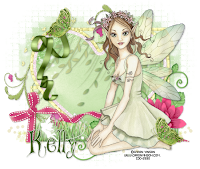
Pixie Magic PTU
7:37 AM
| Posted by
Jane

Pixie Magic
This tut assume your have a working knowledge of PSP.
Kit: Pixie Magic by Angel's Designz,thank you for letting me use this amazing kit!!
Tube: by Caron Vinson, Mysic Moon you can get it here Please use license when using her art work.
Mask:Supplied below,just click on pic for download link.

Template:Template 61 by AquaRebel, you can find it here.
Fonts:Wizard Magic you can download from Dafont.com
Shadow: 1,1, 36, 6 add as you complete each step.
Filters: Xero Fritillary, DSB Bright Noise,
PSP Filters used: Noise,
sa-f-df-nl= Select All, Float, Defloat, New Raster Layer.
sa-f-df= Select All, Float, Defloat.
sa=select all
sn=select none
c/p= copy & paste
Let's begin.
Open your tube, mask and template, duplicate and close the original.
In your template delete the credits, wording, wordart by Aqua, tone, glitter backing wordart layers & heart antique layer.
Click on background layer, add new layer, sa, c/p paper 8 into selelctions, sn, apply your mask and merge group.
Select Heart circle 1, sa-f-df-nl, c/p paper 3 into selections, sn, hide template layer and add a
noise setting of your choice. I used Gaussian, 50, Monochrome.
Repeat the above step for the other heart cirlce.
Select glitter rectangle 1, sa-f-df-nl, c/p paper 3 into selections, sn, apply Fritillary filter
using these settings, 5, 30, 10, 36.
Repeat the above steps for Glitter Rectangle 2, Fritillary Heart layers.
Select the Grad Rectangle 1 layer, sa-f-df, c/p paper 2 as new layer, invert selections and hit delete.
Hide template layer. Repeat this step for the other Grad Rectangle layer.
Select the Glitter heart layer, sa-f-df-nl, c/p paper 4 into selelctions, sn, hide the template layer
Add DSB Bright Noise filter, settings 30, Mix, or Add Noise, using the noise settings above.
Select the Red Heart layer, sa-f-df-nl, c/p paper 8 into selections, sn, hide template layer.
Make sure you are still on your new Heart layerm sa-f-df, c/p AD Ele2 file as new layer resize 80%, postion, invert selections and hit delete.
Finish adding the rest of your elements. I used the following:
AD_Swirl @ 75%
AD_Grass @ 80%
AD_Lotus @ 80%
AD_Ribbon @ 50%
AD_Ele1 @ 100%, c/p as new layer move to the left, duplicate and mirror.
AD_Ribbon2 @ 100%, Immage Mirror.
AD_Butterfly2 @ 40%
Add your copy right and text.
All done.
Thank you for trying my tut.
Subscribe to:
Post Comments
(Atom)


 >
>


0 comments:
Post a Comment