Rebecca Sedwick Collab
Let's Chat!
Enter Block content here...
Lorem ipsum dolor sit amet, consectetur adipiscing elit. Etiam pharetra, tellus sit amet congue vulputate, nisi erat iaculis nibh, vitae feugiat sapien ante eget mauris.
Monday, September 5, 2011
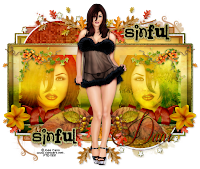
Sinful PTU
8:37 AM
| Posted by
Jane

Sinful
This tut assumes your have a good working knowledge of PSP.
Kit: Rustling Leaves by Dark Moon Dreams you can purchase it here
Tube:Jose Cano, you can purchase the tube here. You must have a license to use this tube.
Mask:GH-Grunge Frame 3 by Ginny which you can download here.
Template: Sinful, Collab template by EyeCandy Graphicz
Fonts: Respective, you can download here
Shadow: 2,2, 36, 6
Filters: SB, Bright Noise, Xero Fratillary
PSP Filters used: None
sa-f-df-nl= Select All, Float, Defloat, New Raster Layer.
sa-f-df= Select All, Float, Defloat.
c/p= copy & paste
Hide template layers as you finish each step you can delete them at the end.
Let's begin.
Open your tube and template, duplicate the template and close the original.
In your template hide the merged layer,Small Black Stars, Pink Small Rectangle layers & Right & Left Diamond Squares.
We'll start at the bottom of the layer pallet and work our way up.
Select the Background layer create a new layer, select all c/p PP09 into selections, select none.
Apply your mask and merge group.
Select the Pink Glitter Stars Left, sa-f-df-nl, c/p PP03 into selections, select none, delete this template layer.
Repeat this step for the Pink GLitter Stars Right and the Small Pink Stars Glitter(near the top of the pallet).
Select the Pink GLitter Rectangle layer, sa-f-df-nl, c/p PP03 into selections, select none, apply DSB Bright Noise, settings at 43, Mix selected.
Repeat this step for Pink GLitter Rectangle Smaller.
Select the Black Rectangle layer, sa-f-df-nl, c/p PP02 into selections, select none.
Select ink Circle Right, sa-f-df, c/p PP09 as new layer, move the paper up or down to your liking, selections invert and hit delete.
Apply xero Fratillary filter use these settings, 5, 109, 24, 33.
Repeat this step for the Pink Circle Left.
Select Small Black Square Left, sa-f-df, c/p PP02 as new layer, move the paper up or down to your liking, selections invert hit delete.
Repeat this step for the Small lack Square Right.
Select the Wordart Pixel Sinful layer, change the colour to grey scale
(Hue & Saturation, settings at 0)
and re-colour to a dark shade of green using the Manual Colour Correction tool, I used #193002.
Select the Wordart "sinful" Pink glitter Left, sa-f-df, c/p PP03 as new layer, selections invert and delete.
Apply DSB Bright Noise use same settings before.
and re-colour to a dark shade of green using the Manual Colour Correction tool, I used #193002.
Select the Wordart "sinful" Pink glitter Left, sa-f-df, c/p PP03 as new layer, selections invert and delete.
Apply DSB Bright Noise use same settings before.
Do the same for the other "sinful" Pink Glitter.
Select the White Rectangle layer, sa-f-df-nl, c/p PP02 into selections, selelct none.
Select Small Black Square Left again, sa-f-df, If you are using the same tube as I am c/p layer 1 as a new layer.
Position your tube and selections invert hit delete. Duplicate your tube layer and Image, Mirror.
Move this layer up on your pallet so that you can see it.
Change the blend mode to both tubes layers to Overlay.
Select the top layer in your pallet, c/p Layer 3 from your tube image as a new layer.
Now you can add your elements, I used the following:
Branch 1, c/p as new layer above the Pink Circle layer, postion, duplicate and mirror. C/p again move down, duplicate and mirror.
Branch 2 @ 50% c/p, as top layer position, duplicate and mirror.
Flower 1 @ 50% 2 times c/p position and Image Mirror
Leaf 3 @ 60% postion & Image Mirror
Ribbon 1 @ 40% position & Image Mirror
Add your copy right and text.
All done.
Subscribe to:
Post Comments
(Atom)


 >
>


0 comments:
Post a Comment