Rebecca Sedwick Collab
Let's Chat!
Enter Block content here...
Lorem ipsum dolor sit amet, consectetur adipiscing elit. Etiam pharetra, tellus sit amet congue vulputate, nisi erat iaculis nibh, vitae feugiat sapien ante eget mauris.
Sunday, October 16, 2011
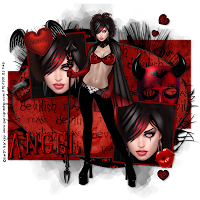
Devilish Tease PTU
12:23 PM
| Posted by
Jane

Devilish Tease
This tut assumes your have a Good working knowledge of PSP.
Kit: Devilish Tease by Angels Designz, you can purchase her kit here
Tube: Keith Garvey, you can purchase his tube here
Mask: by Horseplay's Pasture, mask 19, you can download from here
Template: by Horseplay's Pasture, template 131, you can download from here
Fonts: Quastic Kaps Line you can download it here
Shadow: 2,2, 36, 6
Filters: Xero, Porcelain (optional)
PSP Filters used: None
sa-f-df-nl= Select All, Float, Defloat, New Raster Layer.
sa-f-df= Select All, Float, Defloat.
c/p= copy & paste
sa=select all
sn=select none
See finished tag for placement of tube/elements.
Let's begin.
Open your tube/s, mask and template, duplicate the template and close the original.
In the template delete the following; Credit & Strip layers.
Select the back ground layer, add a new layer, sa, c/p paper 11 into selections, sn.
Apply your mask and merge group.
Select Circle 1 layer, sa-f-df, c/p paper 3 as new layer, selections invert, hit delete. Delete template layer.
Repeat this step for Circle 2 layer.
Select Back Right Rectangle, sa-f-df-nl, c/p paper 1 into selelctions,sn, delelte teplate layer.
Repeat this step for Back Left Rectangle layer.
Select Oval Back layer, sa-f-df, c/p paper 11 as new layer, selections invert, hit delete.
Delete template layer.
Select Oval layer, sa-f-df, c/p paper 4 as new layer, selections invert, hit delete, keep selelcted.
C/P close up of tube as new layer, hit delete, sn.
Change the blend mode to Soft Light.
Select the Top Rectangle, sa-f-df, c/p paper 9 as new layer, selection invert, hit delete, keep selections, c/p paper 5 as new layer, hit delete, keep selected, invert selelctions, modify, contract by 4 pixels, hit delete, sn.
Select the Top Rectangle, sa-f-df, c/p tube as new layer position, selelctions invert hit delete, apply Xero Porcelain filter using only the Red Channel set at 255 the others at 0.
Repeat the above steps for the Bottom rectangle.
C/P your tube as new layer.
You can now add the elements, I used the following:
Mask @ 50%
Razor @ 30%
Lips @ 30% then again @ 50%
Devil Heart @ 50%
Heart Chain @ 100%
Feather @ 80%, position to the left, duplicate and mirror.
Add your copy right and text.
All done.
Subscribe to:
Post Comments
(Atom)


 >
>


0 comments:
Post a Comment